apisix任务:
apisix 暴露的路由
数据库:myspl
测试用例:
微服务是将大型应用分解成多个独立的组件,每个组件负责对应的项目
系统的架构演变:
单体应用 ——SOA 架构 —— 微服务架构
API 网关
为客户端和服务端之间的交互提供统一的接口。对外提供统一的入口访问,隐藏系统架构的实现细节,让微服务的使用更加友好;同时集成了鉴权、限流、熔断等通用特性,使系统更加标准化,注重业务。
APISIX
APISIX 是一个动态、实时、高性能的云原生 API 网关,提供了负载均衡、动态上游、灰度发布、服务熔断、身份认定、可观测性等丰富的流量管理功能。
# Apache APISIX
# Apache APISIX 软件架构
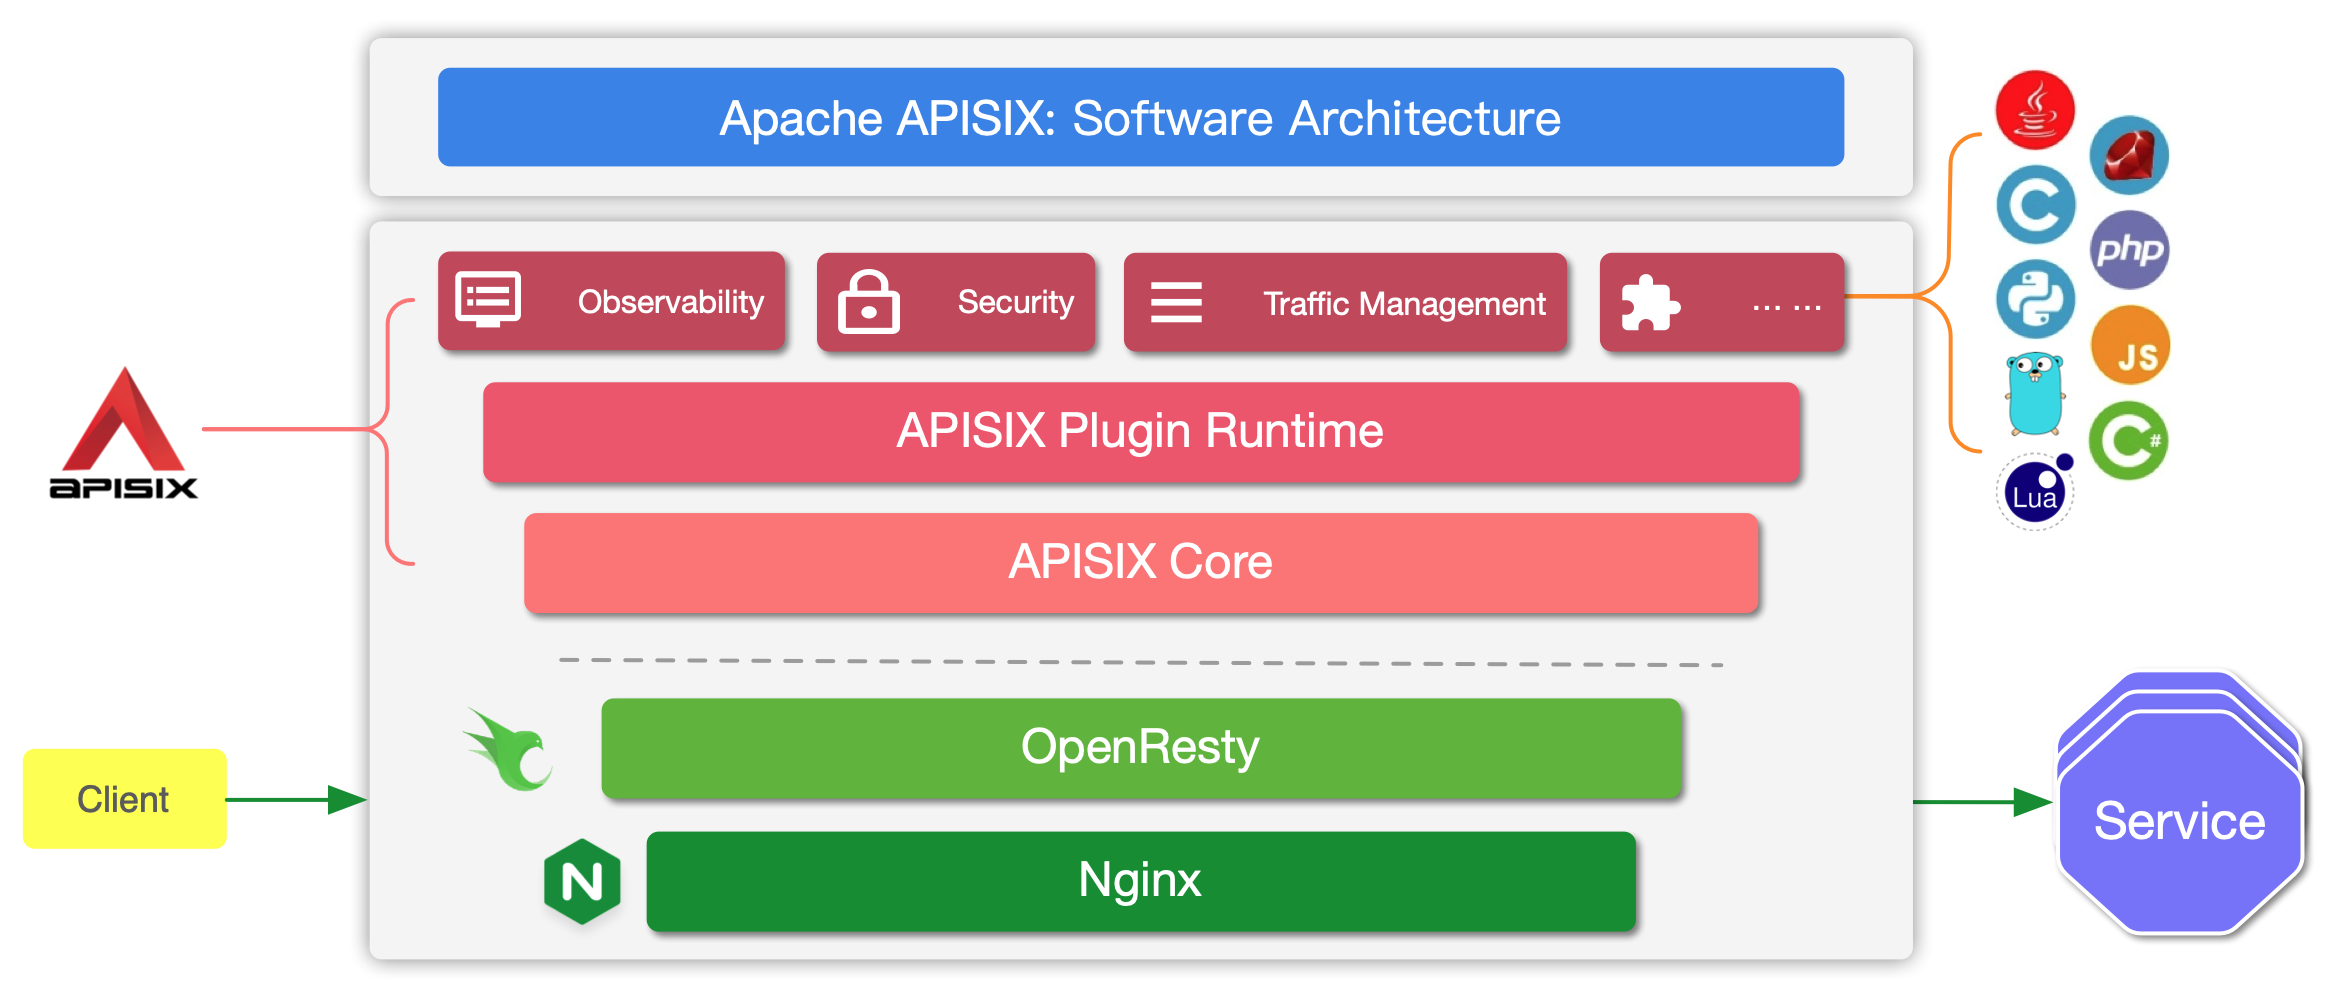

APISIX Core(核心层):
- 核心实现了路由匹配、负载均衡、熔断限流、身份验证等功能。
- 基于 OpenResty,依托于 Nginx 提供高并发处理能力。
APISIX Plugin Runtime(插件运行时):
- 提供灵活的插件机制,可以动态启用或关闭插件
- 常见插件包括身份认证、限流、日志、监控、SSL 等。
- 支持热加载和热更新,不影响服务运行。
Router(路由器模块)
- 负责将请求路由到正确的上游服务。
- 支持多种路由匹配方式,包括域名、路径、HTTP 方法、请求头、参数等。
Upstream(上游模块)
- 定义和管理上游服务信息。
- 支持多种负载均衡算法(如轮询、权重、IP 哈希等)。
- 提供健康检查、故障转移等机制。
Control Plane(控制平面)
- 通过 etcd 提供的配置信息与数据面交互。
- 实现配置的动态分发和管理。
Data Plane(数据平面)
- 处理实际的 API 流量。
- 执行路由转发、插件调用等操作。
Observability(可观测性):
- 主要用于监控和追踪系统的运行状态,如通过日志、指标(Metrics)、分布式追踪等手段提供可视化的系统状态。
Security(安全):
- 提供 API 网关的安全机制,例如认证、授权、数据加密等。
Traffic Management(流量管理):
- 包括限流、负载均衡、熔断等功能,帮助管理和控制流量。
OpenResty 和 Nginx(底层框架):
- APISIX 构建在 OpenResty 之上,而 OpenResty 是基于 Nginx 的高性能 Web 平台。这确保了 APISIX 能够提供高效的网络性能。
# 数据面与控制面架构

这张图展示了 Apache APISIX 的 数据平面(DP) 和 控制平面(CP) 的交互结构:
- 数据平面(Data Plane,DP):
- APISIX 在数据平面中作为网关执行各种功能,如速率限制(Rate Limit)、认证(Auth)、日志记录(Logging)、安全(Security)等。
- 客户端(Client)或服务(Service)通过 APISIX 访问后端服务。
- 支持通过自定义插件扩展功能。
- 控制平面(Control Plane,CP):
- 管理和配置 APISIX 的部分,主要由
Admin API(管理 API) 和etcd组成。 - etcd:一个分布式键值存储,用于存储配置和元数据。
- 管理接口可以通过 CLI 或 API 访问。
- 监控部分如 Apache SkyWalking、Prometheus 和 Grafana 用于提供可视化监控和日志追踪。
- 管理和配置 APISIX 的部分,主要由
# APISIX 主要分为两个部分:
- APISIX 核心:包括 Lua 插件、多语言插件运行时(Plugin Runner)、Wasm 插件运行时等;
- 功能丰富的各种内置插件:包括可观测性、安全、流量控制等。
APISIX 的主要概念和组件
Route :路由,通过路由定义规则来匹配客户端请求,根据匹配结果加载并执行相应的插件,最后把请求转发给指定的上游服务
Upstream :上游,是一组具备相同功能的节点集合,它是对虚拟主机的抽象,可以按照配置规则对服务节点进行负载均衡,它的地址信息可以直接配置到路由或服务上
负载均衡 :负载均衡管理客户端和服务端之间的流量,它决定由哪个服务来处理特定的请求,从而提高性能、可扩展性和可靠性。在设计需要处理大量流量的系统时,负载均衡是一个关键的考虑因素。
# 测试
# 灰度发布
创建路由
curl http://127.0.0.1:9180/apisix/admin/routes/1 \
-H "X-API-KEY: $admin_key" -X PUT -d '
{
    "uri": "/index.html",
    "plugins": {
        "traffic-split": {
            "rules": [
                {
                    "weighted_upstreams": [
                        {
                            "upstream": {
                                "name": "upstream_A",
                                "type": "roundrobin",
                                "nodes": {
                                    "127.0.0.1:1981":10
                                },
                                "timeout": {
                                    "connect": 15,
                                    "send": 15,
                                    "read": 15
                                }
                            },
                            "weight": 3
                        },
                        {
                            "weight": 2
                        }
                    ]
                }
            ]
        }
    },
    "upstream": {
            "type": "roundrobin",
            "nodes": {
                "127.0.0.1:1980": 1
            }
    }
}'
启动对应端口的测试服务:
使用 node 创建简单的服务,监听 1980 和 1981 端口,server1980.js 示例,1981 端口同示例
const http = require('http');

const server = http.createServer((req, res) => {
  if (req.url === '/index.html') {  // 固定路由为 /index.html
    res.writeHead(200, { 'Content-Type': 'text/plain' });
    res.end('Hello from 1980!\n');
  } else {
    res.writeHead(404, { 'Content-Type': 'text/plain' });
    res.end('404 Not Found\n');
  }
});

server.listen(1980, '127.0.0.1', () => {
  console.log('Server running at http://127.0.0.1:1980/index.html');
});
启动服务:
node server1980.js使用 bash 脚本多次访问服务
#!/bin/bash

total_requests=1000
count_1980=0
count_1981=0

for ((i=1; i<=total_requests; i++))
do
  response=$(curl -s http://127.0.0.1:9080/index.html)
  if [[ "$response" == *"Hello from 1980!"* ]]; then
    ((count_1980++))
  elif [[ "$response" == *"Hello from 1981!"* ]]; then
    ((count_1981++))
  fi
done

echo "Requests to 1980: $count_1980"
echo "Requests to 1981: $count_1981"
多次访问测试,访问 9080 和 9081 的次数比会大致为 2:3,下图分别为访问一千次和一万次的结果
![1733300906194]()
![1733396957807]()


# 蓝绿发布
创建路由
curl http://127.0.0.1:9180/apisix/admin/routes/1 \
-H "X-API-KEY: $admin_key" -X PUT -d '
{
    "uri": "/index.html",
    "plugins": {
        "traffic-split": {
            "rules": [
                {
                    "match": [
                        {
                            "vars": [
                                ["http_release","==","new_release"]
                            ]
                        }
                    ],
                    "weighted_upstreams": [
                        {
                            "upstream": {
                                "name": "upstream_A",
                                "type": "roundrobin",
                                "nodes": {
                                    "127.0.0.1:1981":10
                                }
                            }
                        }
                    ]
                }
            ]
        }
    },
    "upstream": {
            "type": "roundrobin",
            "nodes": {
                "127.0.0.1:1980": 1
            }
    }
}'
启动测试服务
访问路由
# 访问新版本服务
curl http://127.0.0.1:9080/index.html -H 'release: new_release' -i

# 访问旧版本服务
curl http://127.0.0.1:9080/index.html -H 'release: old_release' -i

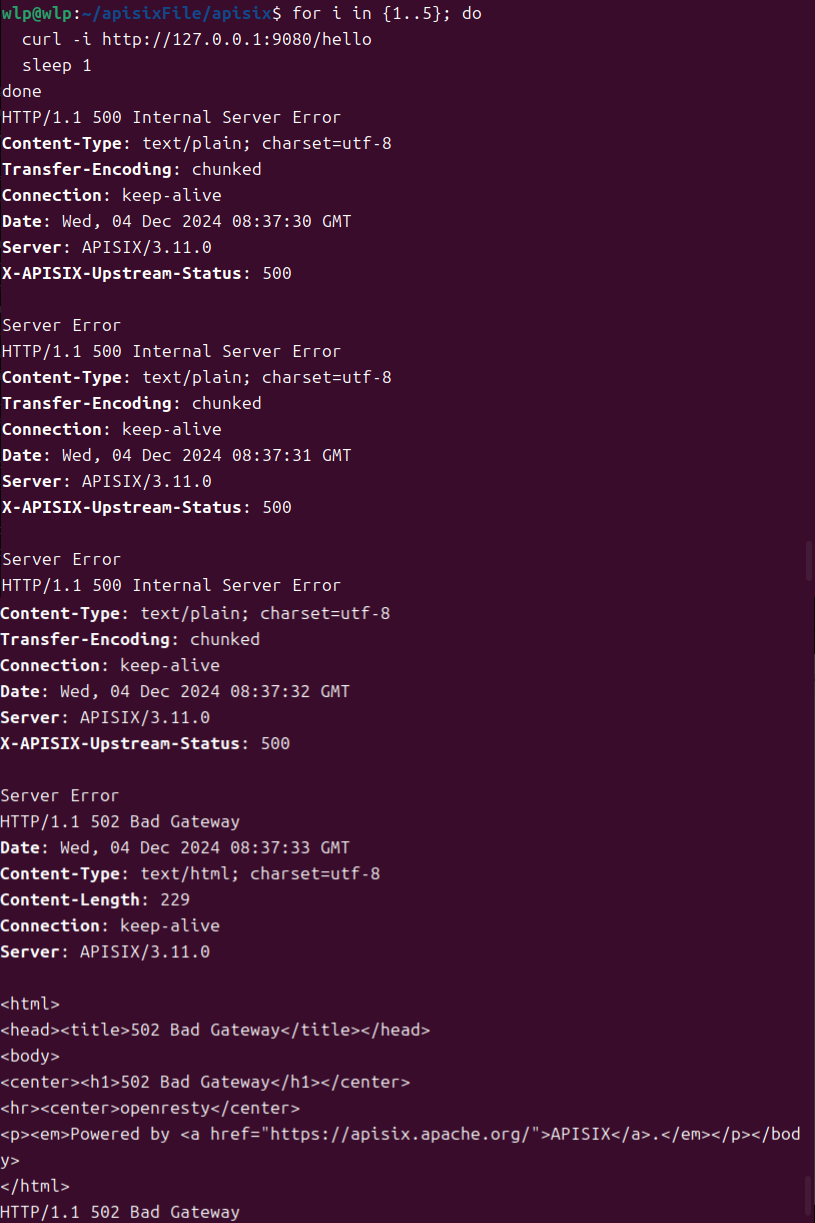
# 服务熔断
返回状态码 500 到达三次
创建路由
curl "http://127.0.0.1:9180/apisix/admin/routes/1" \
-H "X-API-KEY: $admin_key" -X PUT -d '
{
    "plugins": {
        "api-breaker": {
            "break_response_code": 502,
            "unhealthy": {
                "http_statuses": [500, 503],
                "failures": 3
            },
            "healthy": {
                "http_statuses": [200],
                "successes": 1
            }
        }
    },
    "upstream": {
        "type": "roundrobin",
        "nodes": {
            "127.0.0.1:1980": 1
        }
    },
    "uri": "/index.html"
}'
启动服务
const http = require('http');

let failCount = 0;
const server = http.createServer((req, res) => {
  if (req.url === '/hello') {
    failCount++;
    // 模拟连续3次返回500状态码,触发熔断
    if (failCount <= 3) {
      res.writeHead(500, { 'Content-Type': 'text/plain' });
      res.end('Server Error\n');
    } else {
      res.writeHead(200, { 'Content-Type': 'text/plain' });
      res.end('Hello from 1980!\n');
    }
  } else {
    res.writeHead(404, { 'Content-Type': 'text/plain' });
    res.end('Not Found\n');
  }
});

server.listen(1980, '127.0.0.1', () => {
  console.log('Server running at http://127.0.0.1:1980/hello');
});
访问测试
for i in {1..5}; do
  curl -i http://127.0.0.1:9080/hello
  sleep 1
done
# admin-api
Admin API 是一组用于配置 Apache APISIX 路由、上游、服务、SSL 证书等功能的 RESTful API。可以通过 Admin API 来获取、创建、更新以及删除资源。
/apisix/admin/
- Consumer
- Consumer Group
- Global Rules
- Plugin Config
- Protos
- Route
- Service
- SSL
- Stream Route
- Upstream
# Route
Route 也称之为路由,可以通过定义一些规则来匹配客户端的请求,然后根据匹配结果加载并执行相应的插件,并把请求转发给到指定 Upstream(上游)。